Customizing and Editing Order Sets
Customizing and Editing Order Sets
To customize and edit order sets for your hospital or health system, select an order set from the content list and click the Edit link to open the order set in the Content Editor.
Order Sets are assigned version numbers once they are released. A released or retired order set cannot be edited without changing the version number. If you choose a released or retired order set for editing, you will be prompted to create a draft version of the order set, and a new version number will be assigned when that draft is released. See Versioning Order Sets for additional information.
To see a list of shortcut keys for the Content Editor, see Using Shortcut Keys.
This section provides information on performing the following tasks within the Content Editor:
- Navigating the Content Editor
- Moving Items Within an Order Set
- Copying and Pasting Items Within an Order Set
- Cloning Details
- Inserting an Order Set
- Adding Linkable Content to an Order Set
- Adding a Section to an Order Set
- Adding a Bundle to an Order Set
- Adding an Orderable to an Order Set
- Adding a Reminder Item to an Order Set
- Adding a Medication Detail to an Order Set
- Deleting Items from an Order Set
- Modifying Items in an Order Set
- Adding or Editing Performance Measures
- Adding Notes and Build Notes to an Order Set
- Editing Notes and Build Notes
- Viewing Notes and Build Notes in an Order Set
- Deleting Notes and Build Notes from an Order Set
- Adding Tasks to an Order Set
- Viewing Tasks for an Order Set
- Completing Tasks for an Order Set
- Deleting Tasks from an Order Set
- Editing Tasks in an Order Set
- Printing Order Sets
Navigating the Content Editor
From the content list, select the content of interest and click the Edit link to open the Content Editor, shown below:
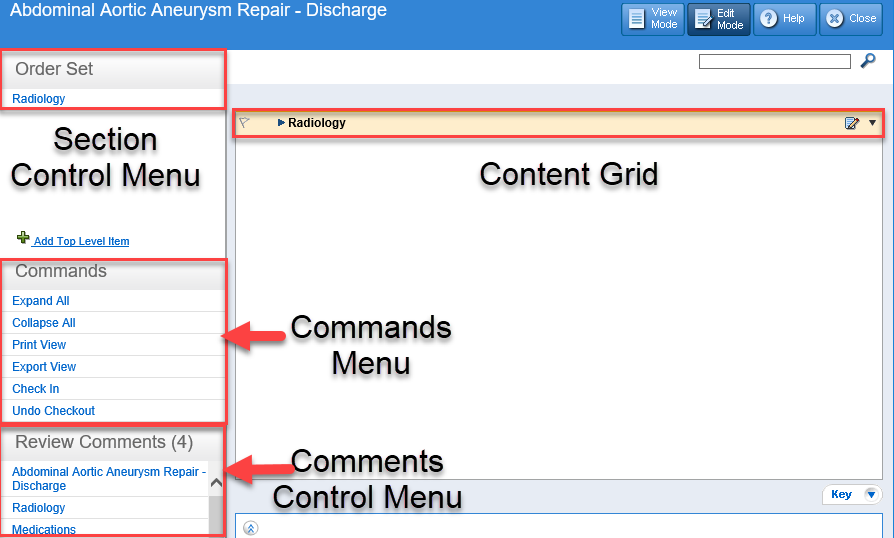
The left pane of the Content Editor displays the following menus:
- Section Control Menu: Includes top-level sections of the content. Click any section to bring it into focus in the content grid. You can also delete any of the sections from this menu.
- Commands Menu: Displays commands for interacting with the content in the content grid. The Commands Menu changes depending on whether you are in View Mode (Content Viewer) or Edit Mode (Content Editor). In general, the commands presented in this menu apply to the content. Instructions for accessing commands from this menu will be written as, for example, “Click Print View on the Commands Menu.”
- Comments Control Menu: Shows review comments from ViewSpace. This menu is always available in the Content Editor. By default, this menu is not displayed in the Content Viewer. If you wish to display review comments in the Content Viewer, contact Zynx Health. Click any item in the Comments Control Menu to bring the item into focus in the content grid, edit the workspace, and open the comment(s) in a separate window.
The right pane of the Content Editor displays the content (order set or plan of care) in a content grid. It shows order items for individual Sections, such as Vital Signs, Activity, Nursing Orders, etc. The view is collapsed by default. To expand or collapse the view, do any of the following:
- To fully expand the content and view all available order items, click Expand All on the Commands Menu on the left side of the screen. To return to the collapsed view, click Collapse All on the Commands Menu.
- To expand an individual Section (for example, Medications), double-click or press the right arrow key anywhere on the line or click the
 icon next to the desired Section. To collapse an individual Section, double-click or press the left arrow key anywhere on the line, or click the
  icon.
icon.
The following icons appear next to each line item in the content grid and can be used to open the Workspace Editor:
- The Edit button (
 ): This button is available for each line item in the content grid. Click the Edit button to open the Workspace Editor.
 - Down-arrow button (
 ): Click the arrow to the right of the Edit button to access a menu of commands to insert, delete, cut, or copy content, or to edit the selected item’s workspace. The available menu options are dependent on the item type. Instructions for accessing these menu commands will be written as, for example, “Click the arrow to the right of the Edit button and select Insert.” Select Insert or Edit to open the Workspace Editor.
The Workspace Editor opens at the bottom of the Content Editor, as shown below.

With the Workspace Editor opened, you can continue to scroll through the content grid. If you make a change in the Workspace Editor without saving it and then try to open another Workspace Editor, you will be prompted to save your changes. The Workspace Editor displays a Workspace, Notes, Tasks, and Performance Measures tabs, depending on the item. When inserting a new item, these tabs appear grayed out and are unavailable until edits to the Workspace tab are saved because the display depends on the item type.
- In the content grid, inactive custom catalog terms and Zynx Health catalog terms appear in red with a dashed underline. In the Workspace Editor, inactive catalog terms appear in red in a dropdown list.
To maximize/minimize the Workspace Editor at any time, click the  or
or
 icons in the upper left of the Workspace Editor. See Content Viewer/Editor Icons for an explanation of the icons that appear in the Content Editor.
Using Shortcut Keys
Use the following shortcut keys to navigate the Content Editor. A list of these shortcuts is also available by clicking the Key button ( ![]() ) at the bottom of the content grid. Select an item and then use the shortcut keys to perform any of these functions:
) at the bottom of the content grid. Select an item and then use the shortcut keys to perform any of these functions:
| Shortcut Commands | Action Performed |
| CTRL+ C | Copy item |
| CTRL + V | Paste item |
| CTRL+ D | Delete item |
| CTRL+ I | Insert item/Clone |
| CTRL+ E | Edit item |
| Down | Move to the next visible item |
| Up | Move to previous visible item |
| Left | Collapse item |
| Right | Expand item |
| CTRL + F3 | Navigate to next search item |
Order Sets in this Status…
| Can be changed to this status… |
| Draft | Released or Review |
| Review | Released or Draft |
| Released | Retired |
| Retired | You can create a Draft version of the Retired order set by duplicating it |
Moving Items Within an Order Set
You can move items or Sections within an order set using a drag and drop operation. Follow these guidelines when moving items or Sections within an order set:
- To move an item or Section to a new location, drop the item or Section immediately above the desired position.
- To move a Section below a Section header so that it appears as a subsection within that Section, hold the shift key while dragging the item to a Section header, release the mouse button, and then release the shift key.
Copying and Pasting Items Within an Order Set
You can copy and paste sections or subsections, order items, drug order details, order item details, or bundles within an order set in the Content Editor, or you can copy items from an order set in the Viewer and then paste them into an order set in the Editor. To copy and paste within the Editor, complete the following steps:
- For the item you wish to copy, click the arrow to the right of the Edit button and then click Copy, or select the item and press CTRL+C. If your selection has children associated with it, a dialog box appears, asking whether you wish to copy the children as well.
- Click the arrow to the right of the Edit button in the row below which you want to paste the copied item and click Paste or select the item below which you want to paste the copied item and press CTRL+V.
To copy items from the Viewer and then paste them into an order set in the Editor, complete the following steps.
- In the Viewer, select the item you wish to copy and click Copy from the Commands Menu. If the item has children, a dialog box appears, asking if you wish to copy the children.
- Open the other order set in the Editor, navigate to the appropriate location, and click the arrow to the right of the Edit button and select Paste or press CTRL+V. The copied item will be pasted below the item selected.
Inserting an Order Set
You can insert the content of a released order set inside another order set. The inserted content can only be modified within the order set into which it was inserted. When the original order set (i.e., the source order set) is updated, the changes will not be reflected in any of the order sets where the original was inserted. Only released order sets are available to be inserted. To insert an order set, complete the following steps:
- To insert the order set at the highest level, select Add Top Level Item. To insert the order set beneath a section, click the arrow to the right of the Edit button and select Insert or press CTRL+I.
- Select Content in the Workspace Editor.
- Click Browse to open the Insert Order Set dialog box. A tree-view of the order set folders appears on the left side of the dialog box. Click
 to expand a folder; click
  to collapse a folder. Click a folder to view its released order sets on the right side of the dialog box.
 - Navigate to the appropriate order set, select it, and click the OK button
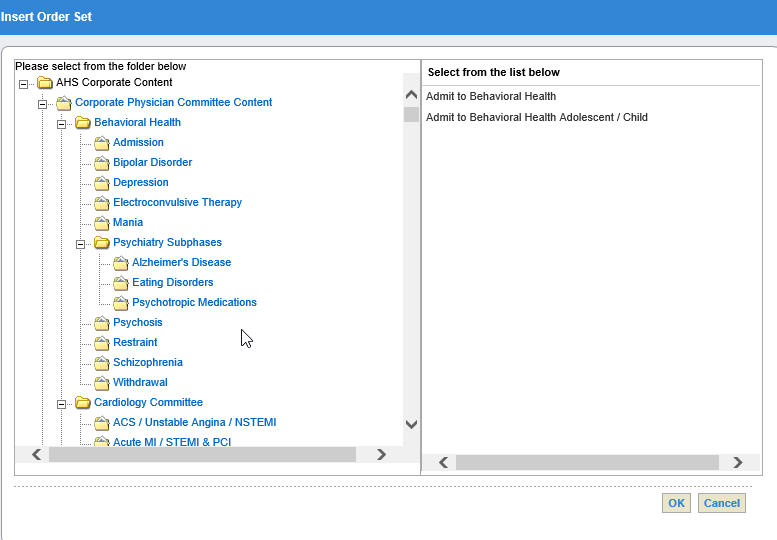
- Click the Save button. (To minimize the Workspace Editor, click the Save & Hide button.)
Adding Linkable Content to an Order Set
Linkable content is any released content (order set or plan of care) that has been marked as linkable content in the Manager. (See Marking the Order Set as Linkable Content and Marking the Plan of Care as Linkable Content.)
Linkable content can be added to an order set. Although it cannot be modified within the order set, when the original linkable content is updated, the updates will appear in all the order sets in which the linkable content is housed.
When printed or exported: Linkable content will be fully expanded when printed or exported. All linkable content items will be displayed within the order set. If you insert linkable content as virtual linkable content, just the name or display name of the linkable content appears (as a placeholder) when the order set is printed or exported, instead of displaying the linkable content in its entirety.
- If you plan to export your order sets to an EMR system, please check your integration manual for instructions on whether your system can handle linkable or virtual linkable content.
In View and Review mode: Linkable content will appear collapsed with an identifying icon ( ![]() for linkable content, and
for linkable content, and ![]() for virtual linkable content). Click on the linkable item to open the full linkable content in View mode in another window. To add linkable content, complete the following steps:
for virtual linkable content). Click on the linkable item to open the full linkable content in View mode in another window. To add linkable content, complete the following steps:
- To insert linkable or virtual linkable content in the Content Editor at the same level as top-level sections, select Add Top Level Item. Inserting the content in this manner will add the linkable content to the bottom of the order set by default. You can then drag and drop it to the desired location. To insert linkable content or virtual linkable content within a Section, click the arrow to the right of the Edit button and select Insert or press CTRL+I. Select Linkable Content from the Workspace Editor to display additional options.

 Click the Browse link to the right of the Map field. This action opens the Insert Linkable Order Set window so that you can search for linkable content to add. A tree-view structure appears on the left side. Click to expand a folder; click to collapse a folder. Click a folder to view its contents on the right side. Only linkable or virtual linkable content will be presented.
- Navigate to the appropriate linkable order set, select it, and click the OK button to return to the Workspace Editor.
- Configure the workspace as necessary:
- Select the Virtual Linkable check box if you wish to display this linkable content as virtual linkable content.
- (optional) Type a name in the Display field for the linkable content. This is the name for the linkable content that will be displayed in the order set. If there is a display name and a linkable content name, only the display name will be used.
- Click the View link to display the expanded linkable order set in the Viewer.
- Click the Clear link to search for different linkable content.
- Click the Save button to submit the change.
Managing Linkable Items in an Order Set
When you release a new version of a linkable item (virtual or nonvirtual), any content in Draft or Review status containing the linkable is automatically updated. However, the linkable will not be updated if it appears in Released content. When you attempt to release linkable content that is contained within a Released order set, the Linked Content dialog box appears (shown below), with options for updating the Released content.
The Linked Content dialog box lists the Released content by type and indicates whether a new version of the content exists in Draft/Review status. Use this information to determine how to proceed.
- If a new version of the content does not exist in Draft/Review status, select the Automatically Apply Change option or the Apply and Edit Change option from the dialog box. You can either leave the new content in Draft status or release it immediately, depending on where that content is in your review/approval process.
- If a newer version of the content exists in Draft/Review status, select the Disregard Change option from the dialog box. Any content in Draft/Review status will automatically be updated when you release the new linkable content.
- If you find that you need to do further research prior to making your selections and releasing the linkable, click on the Run Report button to generate an Excel spreadsheet populated with the information from the dialog box.
To make your selections, click the radio button in the desired column for the appropriate content. If you click Select all below, all radio buttons in that column will be selected.
If you click the Cancel button or close the dialog box by clicking the x in the upper right-hand corner of the dialog box, the dialog box will close, and the linkable content will not be released.

Adding a Section to an Order Set
A Section is a grouping used to organize items in an order set. A Section may appear as the highest level in the order set hierarchy, or within another Section. To add a new section, complete the following steps:
- To add a Section at the highest level within an order set, select Add Top Level Item. This method adds a new Section at the bottom of the order set by default. You can then drag the Section to the desired location at any time. To add a Section within another Section, click the arrow to the right of the Edit button and select Insert or press CTRL+I.
- Select Section from the Workspace Editor.
- From the Print/Export options, you may select Print Only or Export Only (the default is Both). In Print View, items marked as Export Only will not be displayed. In Export View, items marked as Print Only will not be displayed.
- From the Evidence options, you may select one of the following options:
- None: This is the default setting.
- Zynx: If you select this option, the Choose Evidence dialog box will open, allowing you to construct the path for the evidence by selecting, in order, the product, module, and evidence you want to link to.
- Custom: If you select Custom, type the URL in the box.
- Populate one of the following fields to name the Section:
- Catalog: Click the Browse button to open the AuthorSpace Catalog to search the Custom catalog, Zynx catalog, or the Zynx + Custom catalog. The term you select from the catalog will populate the Catalog field. This is the name of the Section that will appear in the order set.
- To clear the Catalog field, click the Clear link.
- Override: If you wish to change the name of the section to something other than what appears in the Catalog field (without changing meaning), type free text in the Override text box. This is the name that will be reflected in the order set.
Text in the Override field is free text and is not recommended for order set integration. In general, you should always refer to your integration manual for instructions on how to optimally build for integration.
- The Additional Info field is free text; type the detail that will be appended to the name (catalog term or override) in the displayed order set.
- Optional: The Comment text box can be used to add free text comments. If an item has comments, the
 icon will appear next to the item in the Viewer and Editor. Users can hover over the icon to display the comments.
 - Click the Save button. (To minimize the Workspace Editor, click the Save & Hide button.)
To add a performance measure to the Section, select the Performance Measures tab from the Workspace Editor to view a list of available performance measures. Select the desired performance measure(s) from the list and then click the Save or Save & Hide button to close the window.
Click the Reset button at any time to clear any selected items.
- The Performance Measures icon (
 ) will appear next to the Section in the order set.
Adding a Bundle to an Order Set
A Bundle is a group of order items that are usually ordered or administered together. There are two types of bundles: group and selection. A group Bundle is a group of items that must be ordered together, while a selection Bundle is a Bundle in which one or more of the items in the group are optional.
Bundles are not recommended for order set integration. In general, you should always refer to your integration manual for instructions on how to optimally build for integration.
To add bundles, complete the following steps:
- From a Section or subsection, click the arrow to the right of the Edit button and select Insert to open the Workspace Editor (or select the Section or subsection of interest and press CTRL+I).
- From the Insert options, select Bundle.
- From the Pre-Select options, select any of the following options:
- Optional: If you select this option, the item will not be preselected in the customized order set. Its check box will be unchecked. The item can be manually selected in the order set.
- Default: If you select this option, the item will be preselected in the customized order set. Its check box will appear with a check mark in it.
- Required: If you select this option, the item will appear as a required item in the customized order set.
- From the Evidence options, select one of the following options:
- None: This is the default setting.
- Zynx: If you select this option, the Choose Evidence dialog box will open, allowing you to construct the path for the evidence by selecting, in order, the product, module, and evidence you want to link to.
- Custom: If you select Custom, type the URL in the box.
- From the Print/Export options, you may select Print Only or Export Only (the default is Both). In Print View, items marked as Export Only will not be displayed. In Export View, items marked as Print Only will not be displayed.
- In the Bundle Name field, type the name of the Bundle.
- Choose either Group Bundle or Selection Bundle from the Bundle Type drop-down list. For group Bundles, the Bundle name appears in the Content Editor with a check box, indicating that all the items in the Bundle are ordered together. For selection Bundles, each item within the bundle appears in the Content Editor with its own check box because each item can be ordered separately.
- In the Additional Info box, add free text to provide details about the Bundle.
- Optional: The Comment text box can be used to add free text comments. If an item has comments, the icon will appear next to the item in the Viewer and Editor. Users can hover over the icon to display the comments. Keep in mind that comments may appear on the paper order set, depending on the format.
- Click the Save button. (To minimize the Workspace Editor, click the Save & Hide button.)
You can add Orderable, Medication, or Reminder items to a Bundle. See Adding an Orderable to an Order Set; Adding a Reminder Item to an Order Set; or Adding a Medication a Medication Detail to an Order Set.
A Bundle is designated by either a right-pointing arrow ![]() or a downward pointing arrow
or a downward pointing arrow ![]() to the right of the item. These arrows indicate whether the Bundle is collapsed or expanded. (You can also double-click to collapse or expand the Bundle.)
to the right of the item. These arrows indicate whether the Bundle is collapsed or expanded. (You can also double-click to collapse or expand the Bundle.)
Adding an Orderable to an Order Set
To add an orderable, complete the following steps:
- From a Section, subsection, or Bundle in the Content Editor, click the arrow to the right of the Edit button and select Insert or press CTRL+I. In the Workspace Editor, select Non-med order or Med order from the Insert options.
- From the Pre-Select options, select one of the following:
- Optional: If you select this option, the item will not be preselected in the customized order set. Its check box will be unchecked. The item can be manually selected in the order set.
- Default: If you select this option, the item will be preselected in the customized order set. Its check box will appear with a check mark in it.
- Required: If you select this option, the item will appear as a required item in the customized order set.
- From the Evidence options, select one of the following:
- None: This is the default setting.
- Zynx: If you select this option, the Choose Evidence dialog box will open, allowing you to construct the path for the evidence by selecting, in order, the product, module, and evidence you want to link to.
- Custom: If you select Custom, type the URL in the box.
- From the Print/Export options, you may select Print Only or Export Only (the default is Both). In Print View, items marked as Export Only will not be displayed. In Export View, items marked as Print Only will not be displayed.
- Populate one of the following fields to name the Orderable:
- Catalog: Click the Browse button to open the AuthorSpace Catalog to search the Custom catalog, Zynx catalog, or the Zynx + Custom catalog. The term you select from the catalog will populate the Catalog field. This is the name of the Orderable that will appear in the order set.
- To clear the Catalog field, click the Clear link.
- Override: If you wish to change the name of the section to something other than what appears in the Catalog field (without changing meaning), type free text in the Override text box. This is the name that will be reflected in the order set.
Text in the Override field is free text and is not recommended for order set integration. In general, you should always refer to your integration manual for instructions on how to optimally build for integration.
- The Additional Info field is free text; type the detail that will be appended to the name (catalog term or override) in the displayed order set.
- Optional: The Comment text box can be used to add free text comments. If an item has comments, the icon will appear next to the item in the Viewer and Editor. Users can hover over the icon to display the comments.
- Click the Save button. (To minimize the Workspace Editor, click the Save & Hide button.)
To add a performance measure to the orderable, select the Performance Measures tab from the Workspace Editor to view a list of available performance measures. Select the desired performance measure(s) from the list and then click the Save or Save & Hide button to close the window.
Click the Reset button at any time to clear any selected items.
The Performance Measures icon ( ![]() ) will appear next to the orderable in the order set.
) will appear next to the orderable in the order set.
Searching the AuthorSpace Catalog
You can populate the Catalog field in a workspace with a term from the Zynx catalog, Custom catalog, or Zynx + Custom catalog. First, select Add Top Level item and select Section. The Browse link next to the Catalog field to open the AuthorSpace Catalog dialog. Complete the following steps to search for a term in the catalog:
- From the Catalog drop-down, select whether you want to search the Zynx catalog, Custom catalog, or Zynx + Custom catalog.
- From the Term Type drop-down, select the type.
- Enter the text to search for in the Term Name field and click the Search button.
- The system searches for each word/letter in the Term Name field.
- If you do not specify a term type, type at least 2 characters in the Term Name field.
- If you specify a term type without typing any characters in the Term Name field, clicking the Search button returns all items of that term type from the specified catalog.
- Select the item you wish to use and click the OK button. The item you selected will populate the Catalog field in the workspace.
Adding a Reminder Item to an Order Set
To add a Reminder, complete the following steps:
- From a Section, subsection, or Bundle in the Content Editor, click the arrow to the right of the Edit button and select Insert, or press CTRL+I. In the Workspace Editor, select Reminder from the Insert options.
- From the Print/Export options, you may select Print Only or Export Only (the default is Both). In Print View, items marked as Export Only will not be displayed. In Export View, items marked as Print Only will not be displayed.
- From the Evidence options, select one of the following:
- None: This is the default setting.
- Zynx: If you select this option, the Choose Evidence dialog box will open, allowing you to construct the path for the evidence by selecting, in order, the product, module, and evidence you want to link to.
- Custom: If you select Custom, type the URL in the box.
- The Text box is a free text field; type the Reminder text. The text will appear in the order set exactly as typed.
- Optional: The Comment text box can be used to add free text comments. If an item has comments, the will appear next to the item in the Viewer and Editor. Users can hover over the icon to display the comments.
- Click the Save button. (To minimize the Workspace Editor, click the Save & Hide button.)
To add a performance measure to the reminder, select the Performance Measures tab from the Workspace Editor to view a list of available performance measures. Select the desired performance measure(s) from the list and then click the Save or Save & Hide button to close the window.
Click the Reset button at any time to clear any selected items.
- The Performance Measures icon ( ) will appear next to the Reminder in the order set.
Adding a Medication Detail to an Order Set
To add a Medication, complete the following steps:
- From the Medications section in the Content Editor, click the arrow to the right of the Edit button and select Insert, or press CTRL+I. In the Workspace Editor, select Med Order from the Insert options.
- From the Pre-Select options, select one of the following:
- Optional: If you select this option, the item will not be preselected in the customized order set. Its check box will be unchecked. The item can be manually selected in the order set.
- Default: If you select this option, the item will be preselected in the customized order set. Its check box will appear with a check mark in it.
- Required: If you select this option, the item will appear as a required item in the customized order set.
- From the Evidence options, select one of the following:
- None: This is the default setting.
- Zynx: If you select this option, the Choose Evidence dialog box will open, allowing you to construct the path for the evidence by selecting, in order, the product, module, and evidence you want to link to.
- Custom: If you select Custom, type the URL in the box.
- From the Print/Export options, you may select Print Only or Export Only (the default is Both). In Print View, items marked as Export Only will not be displayed. In Export View, items marked as Print Only will not be displayed.
- Populate one of the following fields to name the Orderable:
- Catalog: Click the Browse button to open the AuthorSpace Catalog to search the Custom catalog, Zynx catalog, or the Zynx + Custom catalog. The term you select from the catalog will populate the Catalog field. This is the name of the Orderable that will appear in the order set.
- To clear the Catalog field, click the Clear link.
- Override: If you wish to change the name of the section to something other than what appears in the Catalog field (without changing meaning), type free text in the Override text box. This is the name that will be reflected in the order set.
Text in the Override field is free text and is not recommended for order set integration. In general, you should always refer to your integration manual for instructions on how to optimally build for integration.
- The Additional Info field is free text; type the detail that will be appended to the name (catalog term or override) in the displayed order set.
- Optional: The Comments text box can be used to add free text comments. If an item has comments, the icon will appear next to the item in the Viewer and Editor. Users can hover over the icon to display the comments.
- Click the Save button. (To minimize the Workspace Editor, click the Save & Hide button.)
To add a performance measure to the Medication, select the Performance Measures tab from the Workspace Editor to view a list of available performance measures. Select the desired performance measure(s) from the list and then click the Save or Save & Hide button to close the window.
Click the Reset button at any time to clear any selected items.
The Performance Measures icon ( ![]() ) will appear next to the Medication in the order set.
) will appear next to the Medication in the order set.
Deleting Items from an Order Set
To remove sections or subsections, order items, details, or bundles from an order set, complete the following steps:
- In the Content Editor, click the arrow to the right of the Edit button and select Delete for the item you wish to delete, or select the item of interest and press CTRL+D.
- To restore the deleted item, click Undo Delete from the Commands Menu.
Sections and subsections have parent/child relationships. If you select a Section or subsection to delete, that entire Section, including children contained within it, will be deleted. If you select a Non-med order or Med order, the order details will be deleted as well.
You can also delete Sections from the Section Control Menu. Hover over the Section you wish to delete and then click (![]() ).
).
You can flag items for deletion without removing them from view right away. Click the Flag icon (![]() ) to flag an item and any of its children. When you are ready to delete flagged items, select the Delete Flagged button at the bottom of the content grid.
) to flag an item and any of its children. When you are ready to delete flagged items, select the Delete Flagged button at the bottom of the content grid.
To unflag an item, click the previously selected Flag icon (![]() ) next to the item. Unflag all flagged items by clicking on the Unflag All button at the bottom of the content grid.
) next to the item. Unflag all flagged items by clicking on the Unflag All button at the bottom of the content grid.
Modifying Items in an Order Set
To modify order items or Sections, complete the following steps:
- For the item or Section, either click the Edit button or click the arrow to the right of the Edit button and select Edit. The appropriate workspace will open with the current information already filled in.
- Click in any field to modify it.
- Click the Save button. (To minimize the Workspace Editor, click the Save & Hide button.)
See Adding a Section to an Order Set, Adding a Bundle to an Order Set, Adding an Orderable to an Order Set, Adding a Reminder Item to an Order Set, and Adding a Medication Detail to an Order Set for information on each type of workspace.
Adding or Editing Performance Measures
You can add performance measures to a Section or orderable, or you can edit currently existing performance measures. To add or edit performance measures, select a Section or orderable and complete the following steps:
- For the item or Section, either click the Edit button or click the arrow to the right of the Edit button and select Edit. Then select the Performance Measures tab from the Workspace Editor to view a list of available performance measures.
- Select the desired performance measure(s) from the list.
- Click the Save button. (To minimize the Workspace Editor, click the Save & Hide button.)
The Performance Measures icon (![]() ) will appear next to the item in the Editor.
) will appear next to the item in the Editor.
Adding Notes and Build Notes to an Order Set
You can add Notes or Build Notes to items (but not to details) within an order set. Build Notes are for internal use and pertain to the integration of the order set into your hospital’s information system. To add Notes or Build Notes to an item, complete the following steps:
- For an item, click the Edit button, click the arrow to the right of the Edit button and select Edit, or press CTRL+E to open the Workspace Editor.
- Select the Notes tab in the Workspace Editor.
- Click the New button.
- Select Note or Build Note from the Type options.
- Type the Note in the Note box (note editor).
- Click the Save link. (To minimize the Workspace Editor, click the Save & Hide link.)
The ![]() icon will appear next to the item to indicate that a Note is available for display.
icon will appear next to the item to indicate that a Note is available for display.
Notes can be deleted and edited. When you export content, you can choose to display the Build Notes in the export files. See Exporting Order Sets.
Editing Notes and Build Notes
To edit existing Notes or Build Notes for an order item or Section, complete the following steps:
- For an item or Section, click the Edit button or click the arrow to the right of the Edit button and then select Edit to open the Workspace Editor.
- Select the Notes tab in the Workspace Editor.
- If the note is not displayed, select the appropriate type from the Show options.
- Select the Note or Build Note and click the Edit button.
- Edit the Note in the Note box (note editor).
- Click the Save link. (To minimize the Workspace Editor, click the Save & Hide link.)
Viewing Notes and Build Notes in an Order Set
The ![]() icon appears next to items to indicate that a Note is available for display. In the Editor, open the Workspace Editor for the item, select the Notes tab, and then select the type of notes you wish to display
icon appears next to items to indicate that a Note is available for display. In the Editor, open the Workspace Editor for the item, select the Notes tab, and then select the type of notes you wish to display
(Notes, Build Notes, or All). In the Viewer, click the ![]() icon to display the information in a new window. By default, the Notes tab opens with all Notes and Build Notes displayed. To view only Notes, select the Notes option. Or to view only Build Notes, select the Build Notes option.
icon to display the information in a new window. By default, the Notes tab opens with all Notes and Build Notes displayed. To view only Notes, select the Notes option. Or to view only Build Notes, select the Build Notes option.
Deleting Notes and Build Notes from an Order Set
The ![]() icon appears next to items to indicate that a Note is available for display. To delete Notes or Build Notes from an item, complete the following steps:
icon appears next to items to indicate that a Note is available for display. To delete Notes or Build Notes from an item, complete the following steps:
- For an item, click the Edit button, click the arrow to the right of the Edit button and select Edit, or press CTRL+E to open the Workspace Editor.
- Select the Note to delete.
- Click the Delete button. Click Yes to confirm when prompted.
Adding Tasks to an Order Set
You can add Tasks on items (but not item details) within an order set and assign them to other users to complete. To assign a task to a person, that person must have a valid e-mail address in AuthorSpace. To add Tasks to an item, complete the following steps:
- For an item, click the Edit button, click the arrow to the right of the Edit button and select Edit, or press CTRL+E to open the Workspace Editor.
- In the Workspace Editor, select the Tasks tab.
- Click the New button.
- Type the Task in the Subject box.
- To assign the Task to the appropriate user, select a name from the To drop-down list at the bottom of the screen. You can assign multiple users to a task.
- Click the Save link. (To minimize the Workspace Editor, click the Save & Hide link.)
The ![]() icon will appear next to the appropriate items, indicating that there are associated Tasks.
icon will appear next to the appropriate items, indicating that there are associated Tasks.
Viewing Tasks for an Order Set
When the ![]() icon appears next to items, it indicates that there are associated Tasks. To view Tasks for an item, complete the following steps:
icon appears next to items, it indicates that there are associated Tasks. To view Tasks for an item, complete the following steps:
- For an item, click the Edit button, click the arrow to the right of the Edit button and select Edit, or press CTRL+E to open the Workspace Editor.
- In the Workspace Editor, select the Tasks tab. Tasks appear on the left side of the tab.
Completing Tasks for an Order Set
When the ![]() icon appears next to items, it indicates that there are associated Tasks. To mark a Task as complete, perform the following steps:
icon appears next to items, it indicates that there are associated Tasks. To mark a Task as complete, perform the following steps:
- For an item, click the Edit button, click the arrow to the right of the Edit button and select Edit, or press CTRL+E to open the Workspace Editor.
- In the Workspace Editor, select the Tasks tab.
- Select the task you would like to complete, click Edit, and change the Status in the drop-down list to Complete.
- Click Save. The Task will be marked as complete.
Deleting Tasks from an Order Set
When the ![]() icon appears next to items, it indicates that there are associated Tasks. To delete a Task, perform the following steps:
icon appears next to items, it indicates that there are associated Tasks. To delete a Task, perform the following steps:
- For an item, click the Edit button, click the arrow to the right of the Edit button and select Edit, or press CTRL+E to open the Workspace Editor.
- In the Workspace Editor, select the Tasks tab.
- Select the Task to delete.
- Click the Delete button.
Editing Tasks in an Order Set
When the ![]() icon appears next to items, it indicates that there are associated Tasks. To edit a Task, perform the following steps:
icon appears next to items, it indicates that there are associated Tasks. To edit a Task, perform the following steps:
- For an item, click the Edit button or press CTRL+E to open the Workspace Editor.
- In the Workspace Editor, select the Tasks tab.
- Select a Task and click the Edit button. Make the necessary edits and then click the Save link.
Printing Order Sets
To select a print format for an order set, complete the following steps:
- To open the Print dialog box, do one of the following:
- Select an order set from the content list and click the Print link.
- In the Content Editor, click Print View from the Commands Menu. Then click Print from the Commands Menu.
- In the Content Viewer, click Print from the Commands Menu.
- Select the format for saving and printing your file and click the Go button. The following formats are available:
- Review Report V.1, Text: Lists order set header information and all the reviews for the order set in a text file. Provides a way to see all the reviews for an order set without opening the Content Manager and scrolling through all the order set review notes. Can be opened in WordPad or Notepad.
- Standard HTML V.1, HTML: Saves the order set as an HTML page that can be opened by a Web browser. Order items have functional check boxes, so you can set default items by selecting or deselecting these check boxes. You can click Evidence links to access Evidence pages that open in a Web browser. You can also see which items have a performance measure associated with them. Item details are displayed on the same line as the order to which they apply.
- Standard HTML V.2, HTML: Saves the order set as an HTML page that can be opened by a Web browser. Order items have nonfunctional grey check boxes. You can click Evidence links to access Evidence pages that open in a Web browser. You can also see which items have a performance measure associated with them. Item details are displayed on the same line as the order to which they apply
- Standard HTML V.3, HTML: Saves the order set as an HTML page that can be opened by a Web browser. Order items have nonfunctional blue check boxes. You can click Evidence links to access Evidence pages that open in a Web browser. You can also see which items have a performance measure associated with them. Item details are displayed below the order to which they apply. The Standard HTML V.3 format is very similar to the Standard HTML V.1 format. The difference is that Standard HTML V.3 prints each order sentence on its own line, so it will look the same as it does in AuthorSpace.
- Standard RTF V.1, RTF: Saves the order set as a rich text format (RTF) file that can be opened in Word or an RTF editor; drug order details appear on the same line as the medication.
- Standard RTF (Edit View) V.2, RTF: Saves the order set as a rich text format (RTF) file that can be opened in Word or an RTF editor; drug order details appear on a separate line from the medication.
- Standard Text V.1, Text: Saves the order set to a text file that can be opened in WordPad or Notepad.
- Standard XLS V.1, XLS: Saves the order set in a spreadsheet that can be opened in Excel. Any internal notes or tasks associated with an order set item or Section are also saved to the spreadsheet.
Note: Only order sets with a print template applied can be previewed in an editable Preview Window.
You can save the file to print later, open and print the order set, or cancel the action. If you have trouble printing in the format you selected, you may have to indicate in your browser settings that Zynx.com is a trusted site. See the Adding Zynx.com to Trusted Site List section in Optimal Settings for Internet Explorer for information on how to add Zynx.com as a trusted site.