Managing a Plan of Care with the Content Manager
Managing a Plan of Care with the Content Manager
To manage a plan of care, select a checked-in plan of care from the content list and click Manage to open the Content Manager. The Content Manager shows the following information:
- Links at the top of the screen enable users with appropriate permissions to change the status of the plan of care (depending on the current status, you may see links for Release, Retire, Revert to Draft, or Make Reviewable), or request a review of the order set and manage the reviewers.
- Check boxes at the top of the screen enable users to mark the plan of care as a linkable plan of care, or to publish the plan of care to ViewSpace so that it is accessible to Zynx Health Reference Site users. Plans of care published to ViewSpace are noted by the
 icon in the content list (see Content Explorer).
 - The header information at the top of the Content Manager shows details about the plan of care, such as expiration date, venue, assigned team, etc. To edit any of the header information, click Edit Header at the top of the Content Manager screen. See Editing Plans of Care Header Information.
- The Review Status section shows a list of review requests. The request date, the name of the reviewer, the status of the review, and the review date are displayed.
- The Plan of Care Reviews section displays the review date, the reviewer, and the general review comments.
- The Plan of Care History section shows major changes made to the plan of care, the user who made the change, and the date and time the change was made. The most recent changes are listed first.
Perform the following tasks with the Content Manager:
- Editing Plans of Care Header Information
- Initiating/Requesting a Review for a Plan of Care in the Content Manager
- Checking the Status of a Review for a Plan of Care in the Content Manager
- Managing Reviewers for a Plan of Care in the Content Manager
- Changing the Status of Plans of Care
- Marking the Plan of Care as Linkable Content
Editing Plans of Care Header Information
The top of the Content Manager screen shows header information for the plan of care. Only administrators or Environment Managers can make edits in the Edit Header screen. To edit any of the header information, complete the following steps:
- In the Content Manager, click the Edit Header link to open the Edit Header screen.
- Edit any of the following fields/areas:
- Rename: This field allows you to rename the plan of care. Type a new name for the plan of care in the field.
- Expiration Date: Click the calendar icon and select the appropriate date or type a date in the field using any of the following 10-character formats: MM/DD/YYYY, MM-DD-YYYY, or MM.DD.YYYY. This is the date the plan of care expires.
- External ID: Type a new external ID for the plan of care. The external ID is optional, depending on your environment. This ID is output in an export file.
- Comments: Type new comments or edit existing comments for the plan of care as necessary. Comments are unique to the environment.
- Edit Module: Click in the Change Module To drop-down list and select from the list to change the module that the plan of care applies to.
- Edit Institution: Select an institution to associate to the plan of care from the Change Institution To drop-down list.
- Edit Venue & Event: Click in the Change Venue To drop-down list and select from the list to change the clinical location for the plan of care. Click in the Change Event To drop-down list and select from the list.
- Edit Team/Edit Owner: Click in the Change Team To drop-down list and select from the list to change the team assigned to the plan of care. Click in the Change Owner To drop-down list and select from the list to change the owner of the plan of care.
The status of the plan of care determines which fields can be edited. For a Draft plan of care, you can edit all the fields. However, for a Released plan of care, you can only edit the expiration date, comments, team, and owner fields. The Change Module To, Change Venue To, and Change Event To fields are not available for editing.
- Click the Save button.
Initiating/Requesting a Review for a Plan of Care in the Content Manager
You can set up a plan of care so that it may be reviewed by other users in the environment. You can send a request via e-mail to select users asking them to review your plan of care. To initiate this review, you must change the status of the plan of care to Review and then publish the plan of care to ViewSpace so that it is accessible to Zynx Health Reference Site users. To initiate the review of a plan of care, complete the following steps:
- In the Content Manager, click the Make Reviewable link. This changes the status of the plan of care to Review. Once the plan of care has this status, comments/feedback from reviewers may be added, pertaining to the entire plan of care or to a specific order item within the plan of care. To add comments, see Adding a Review Comment to a Plan of Care in AuthorSpace.
- Select the Publish to ViewSpace check box. This publishes the plan of care to ViewSpace so that it is accessible to Zynx Health Reference Site users.
- To request a review, click the Request Review link at the top of the screen to open the Request Review dialog box. Complete the fields in the dialog box.
- Specify the reviewer. Click To and select one or more reviewers from the system address book or click New Reviewer to create a new reviewer in the New Reviewer dialog box. See New Reviewer Dialog Box.
- Compose a message to the reviewers in the Message text box.
Click Send to send the request via e-mail to the specified reviewer(s). The e-mail includes a link to the plan of care. The e-mail request also lists all individuals to whom a review request was sent, and the e-mail address of the user who initiated the review request.
To check the status of the review, refer to the Review Status section of the Content Manager screen. See Checking the Status of a Review for a Plan of Care in the Content Manager.
Select E-mail Screen
Search for a reviewer from the system address book. Reviewers, distribution lists, teams, and authors are displayed in an alphabetized list.
Complete the fields at the top of the Select E-mail screen, specify include criteria, and click the Perform Search button.
New Reviewer Dialog Box
To add a new reviewer to the address book for an environment, fill out the New Reviewer dialog box. Specify the first and last name of the reviewer as well as the user’s e-mail address and then click Save.
If the name and e-mail address already exist in the system, a message appears indicating this.
Checking the Status of a Review for a Plan of Care in the Content Manager
You can check the status of a review in the Content Manager screen. The review status is only tracked for users logged in to ViewSpace as registered reviewers. In the content list, select the plan of care being reviewed and then click the Manage link to open the Content Manager screen. Scroll down to the Review Status section near the bottom of the screen to view the request date, the name of the reviewer, the status of the review, and the review date.
ViewSpace Notifications
When you initiate a review, you are automatically signed up to receive ViewSpace Notifications. ViewSpace Notifications arrive via a daily digest e-mail delivered between 3:30 and 5:30 AM PST, and include any comments or replies that were made within the previous 24 hours on content that you sent for review. Reviews can be generated in 3 ways:
- Request a review through the Content Manager.
- Activate content with a review step through Workflow Management.
- Add a reviewer through the Track Progress page in Workflow Management by editing the People.
E-mails are sent only if a comment is added to the content you sent for review. If no comments or replies have been added since the last notification, a new e-mail will not be sent. You will be subscribed to ViewSpace Notifications for as long as the content remains in Review status. Once the status changes to Draft or Released, you automatically stop receiving ViewSpace Notifications for that order set or plan of care.
A sample e-mail notification appears below:
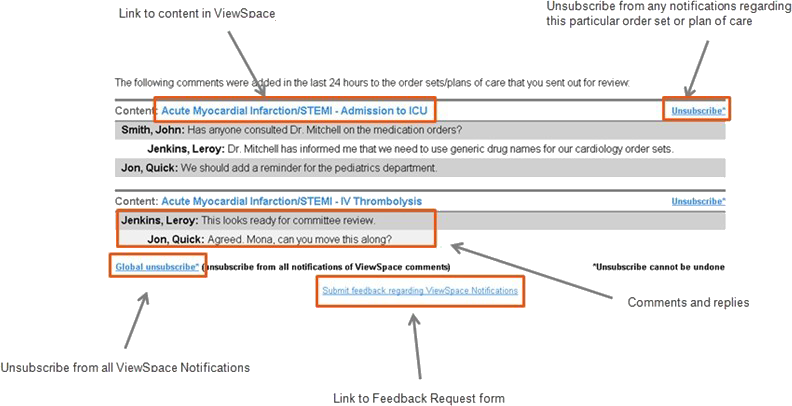
- Link to Content in ViewSpace: Access the content in ViewSpace. This will provide the additional context needed to understand the comments. If you are using a text-only e-mail client, and the ViewSpace link does not work, copy and paste the URL into a Web browser.
- Unsubscribe: Unsubscribe from any notifications regarding this plan of care. To re-subscribe, contact Zynx Product Support.
- Global Unsubscribe: Unsubscribe from all ViewSpace Notifications. To re-subscribe, contact Zynx Product Support.
- Submit feedback regarding ViewSpace Notifications: Report defects, suggest changes, and provide other comments related to this enhancement directly to Zynx Product Support.
Managing Reviewers for a Plan of Care in the Content Manager
Users with appropriate permission can create or edit a registered reviewer or a distribution list.
- “Author” refers to an individual who is an AuthorSpace account holder (AuthorSpace user).
- “Reviewer” refers to an individual who is not an AuthorSpace account holder but who is invited to provide feedback on an order set or plan of care.
- A distribution list is a named collection of reviewers that can be used to facilitate sending a review request to a group of people. It is like an e-mail mailing list and is global to a client environment. It is composed of a group of registered reviewers and/or authors.
Creating a Reviewer in the Content Manager
Users with appropriate permission can create a reviewer. To create a reviewer, complete the following steps:
- In the content list, select a plan of care and then click the Manage link to open the Content Manager screen.
- If a user does not have correct permission, the Manage link will be unavailable. Click the Manage Reviewers link at the top of the screen. The Manage Reviewers main screen opens and displays an address book of reviewers, authors, teams, and distribution lists for the client environment.
- Click the New Reviewer link to open the New Reviewer dialog box to create a registered reviewer. Specify the first and last name of the reviewer as well as the e-mail address and then click Save to return to the Manage Reviewers main screen. If the e-mail address already exists in the system, an error message is displayed indicating that the e-mail address is already registered to another user. The alert also lists the role (Author or Reviewer) associated with the account. Correct the data or cancel and close the New Reviewer screen.
- Click the Close link in the upper right corner to close the Manage Reviewers screen.
You have created a new registered reviewer whose name will appear in the address book.
Editing a Reviewer for a Plan of Care in the Content Manager
Reviewers can be edited by users with either Administrator or Environment Manager privileges; however, Authors and Teams cannot be selected for editing in the address book unless the Author or Team does not have a name or e-mail address available. To edit a reviewer, complete the following steps:
- In the content list, select a plan of care and then click the Manage link to open the Content Manager screen.
- If a user does not have correct permission, the Manage link will be unavailable. Click the Manage Reviewers link at the top of the screen. The Manage Reviewers main screen opens and displays an address book of reviewers, authors, teams, and distribution lists for the client environment. Mouse over a team or distribution list to display a tooltip showing a list of the members whose names and e-mail addresses are missing.
- Double-click a reviewer from the address book, or single-click a reviewer and click the Edit link at the top. The Edit Reviewer screen opens.
- Edit the desired field and click the Save link. Reviewer information is updated and validated according to the following:
- A reviewer is uniquely identified by the combination of e-mail address and client environment. Therefore, an e-mail address may be associated with only one Reviewer within a given client environment.
- An AuthorSpace account holder may not be entered into the system as a reviewer, but an AuthorSpace account holder may be included in a Distribution List.
Creating a Distribution List for a Plan of Care in the Content Manager
Users with either Administrator or Environment Manager privileges can create a distribution list. To create a distribution list, complete the following steps:
- In the content list, select a plan of care and then click the Manage link to open the Content Manager screen.
- If a user does not have correct permission, the Manage link will be unavailable. Click the Manage Reviewers link at the top of the screen. The Manage Reviewers main screen opens and displays an address book of reviewers, authors, teams, and distribution lists for the client environment.
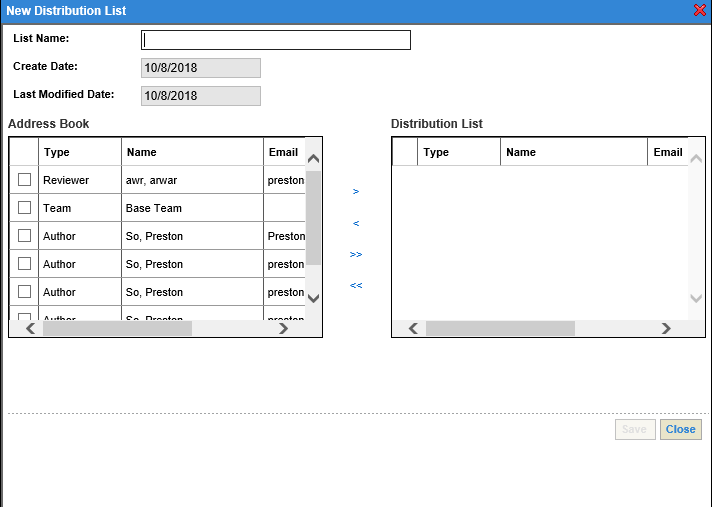
- Click the New Distribution List link at the top of the screen. The New Distribution List screen appears. Complete the requested data and click Save.
- List Name: Provide a name for the distribution list
- Create Date: This date is automatically populated with the current date.
- Last Modified Date: This date is automatically populated with the date on which the distribution list was last modified.
The screen shows 2 list boxes labeled Address Book and Distribution List. (See screenshot at end of section)
- The Address Book lists the available authors and reviewers for the environment who may be added to a distribution list.
- The Distribution List shows the authors and reviewers who make up the distribution list.
- To add authors, reviewers, or distribution lists to the Distribution List, select the appropriate check box in the Address Book list box and click the > link.
- To remove authors, reviewers, or distribution lists from the Distribution List, select the appropriate check box in the Distribution List box and click the < link. The names are moved back to the Address Book.
- To add all authors, reviewers, and distribution lists from the Address Book to the Distribution List, click the >> link.
- To remove all authors, reviewers, and distribution lists from the Distribution List, click the << link.
Editing a Distribution List for a Plan of Care in the Content Manager
Users with either Administrator or Environment Manager privileges can edit a distribution list. To edit an existing distribution list, complete the following steps:
- In the content list, select a plan of care and then click the Manage link to open the Content Manager screen.
- If a user does not have correct permission, the Manage link will be unavailable. Click the Manage Reviewers link at the top of the screen. The Manage Reviewers main screen opens and displays an address book of reviewers, authors, teams, and distribution lists for the client environment.
- Double-click a distribution list from the address book or single-click a distribution list and click the Edit link at the top of the screen. The Edit Distribution List screen opens.
- Edit the list and click Save. You may revise the list name or add or remove names from the Distribution List.
- To add authors, reviewers, or distribution lists to the Distribution list, select the appropriate check box in the Address Book list box and click the > link.
- To remove authors, reviewers, or distribution lists from the Distribution List, select the appropriate check box in the Distribution List and click the < link. The names are moved back to the address book.
- To add all authors, reviewers, and distribution lists from the address book to the Distribution List, click the >> link.
- To remove all authors, reviewers, and distribution lists from the Distribution List, click the << link.
Deleting a Reviewer or Distribution List for a Plan of Care in the Content Manager
Users with either Administrator or Environment Manager privileges can delete Reviewers or Distribution lists. To delete a Reviewer or Distribution List, complete the following steps:
- In the content list, select a plan of care and then click the Manage link to open the Content Manager screen.
- If a user does not have correct permission, the Manage link will be unavailable. Click the Manage Reviewers link at the top of the screen. The Manage Reviewers main screen opens and displays an address book of reviewers, authors, teams, and distribution lists for the client environment. Mouse over a team or distribution list to display a tooltip showing a list of the members whose names and e-mail addresses are missing.
- Select a Reviewer/Distribution List from the list and click the Delete link at the top of the screen. When prompted, click Yes to confirm the deletion.
Changing the Status of Plans of Care
Users with either Administrator or Environment Manager privileges can change the status of plans of care in the Content Manager by clicking the appropriate link at the top of the Content Manager. The link that is available depends on the status assigned to the plan of care. The following table shows valid status changes:
Plans of care with this Status…
| Can be changed to this status… |
| Draft | Released or Review |
| Review | Released or Draft |
| Released | Retired |
| Retired | You can create a Draft version of the Retired plan of care by duplicating it |
Marking the Plan of Care as Linkable Content
Select the Mark as Linkable Content check box at the top of the Content Manager to flag the plan of care as a linkable plan of care. Once a plan of care is flagged as linkable content, it is available to be added to another order set or to another plan of care. See Adding Linkable Content to an Order Set and Adding Linkable Content to a Plan of Care.